I have tons of FREE crochet patterns, cooking recipes, tutorials, and more at my new site!
Click here: TheCrochetDude.com


A place to share some of my original patterns. Please feel free to print these patterns for your own use and charity use. All images and patterns are (c)2004-2020 Drew Emborsky, aka The Crochet Dude(r)

©2009-2010 by Drew Emborsky, aka
The Crochet Dude®
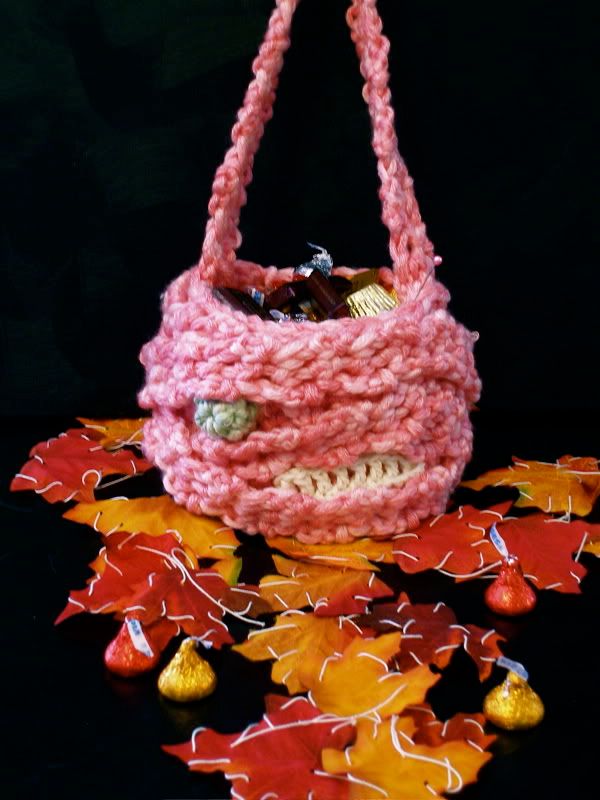
Since the pink ribbon is the symbol for breast cancer awareness I designed a purse that is pink, and has ribbing, get it? Make one for yourself and as gifts, and remember that you can make it any color you want as long as you make the first one pink.
Finished Size
14.5” wide at base x 13” tall w/out handles
Materials
Worsted weight yarn in two shades of pink:
Dark pink – 250 yds
Light pink – 250 yds
Crochet hook size K/10.5 – 8.5 mm (I prefer Boye brand)
Yarn needle
Magnetic purse closures
Pink 24” curtain tie back for handle (I used Wright’s found at a fabric store)
Designer note: Hold one strand of each the dark and the light pink together throughout pattern unless otherwise indicated
For more information about breast cancer awareness visit the
Susan G. Komen for the Cure ® website at www.komen.org
Pink Ribbing Pattern
Ribbed Base
Row 1 Ch 11, sc into 2nd ch from hook and into ea ch across, turn (10 sc)
Rows 2-40 Ch 1, sc into back loop of ea st across, turn (10 sc)
After last row of base, do not turn, do not fasten off
Body
Now work in the round, start by working a sc in last st of ea row across the long edge of the base (40 sc) then by working a sc in the base of each st along the foundation ch (10 more sc) then again across the other long edge of the base working a sc in last st of ea row (40 more sc) then finally work a sc in ea st of the last row of the base (10 more sc), that should bring you around to the first st of the body (100 sc total)
Do NOT join the rounds, place a scrap of yarn or stitch marker in the last st of ea row to indicate the end of a round
Sides
Rnd 1 Sc in next 8 sts, sc2tog, sc in next 20 sts, sc2tog, sc in next 26 sts, sc2tog, sc in next 20 sts, sc2tog, sc in remaining 18 sts (96 sc)
Rnd 2 Sc in next 7 sts, sc2tog, sc in next 20 sts, sc2tog, sc in next 24 sts, sc2tog, sc in next 20 sts, sc2tog, sc in remaining 17 sts (92 sc)
Rnd 3 Sc in next 6 sts, sc2tog, sc in next 20 sts, sc2tog, sc in next 22 sts, sc2tog, sc in next 20 sts, sc2tog, sc in remaining 16 sts (88 sc)
Rnd 4 Sc in next 5 sts, sc2tog, sc in next 20 sts, sc2tog, sc in next 20 sts, sc2tog, sc in next 20 sts, sc2tog, sc in remaining 15 sts (84 sc)
Rnd 5 Sc in next 4 sts, sc2tog, sc in next 20 sts, sc2tog, sc in next 18 sts, sc2tog, sc in next 20 sts, sc2tog, sc in remaining 14 sts (80 sc)
Rnds 6-11 Sc in ea st around (80 sc)
Fasten off
Ribbed Handle Bases
Lay purse flat and find the center st of one of the long sides, join with a sc on the WS of the row,
Row 1 sc in next 39 sts, turn
Row 2 Ch 1, sk 1st st, sc in back loop of ea st across to within last 2 sts, sk 1 st, sc in back loop of last st, turn
Repeat Row 2 until 4 sts remain, fasten off
Repeat for other side of handle base.
Decorative Button (make 2)
With light pink only, ch 3, 12 dc in 3rd ch from hook. Sl st to first dc, fasten off
Finishing and Assembly
With RS facing, attach both yarns at top of handle base and work one row of sc down one side and up the other side.
Fasten off. Repeat on other side of purse
Whipstitch tie backs securely into place. Attach magnetic purse snaps according to manufacturer’s instructions. Whipstitch decorative button into place to hide back of magnetic purse snaps.


 I Want My Mummy
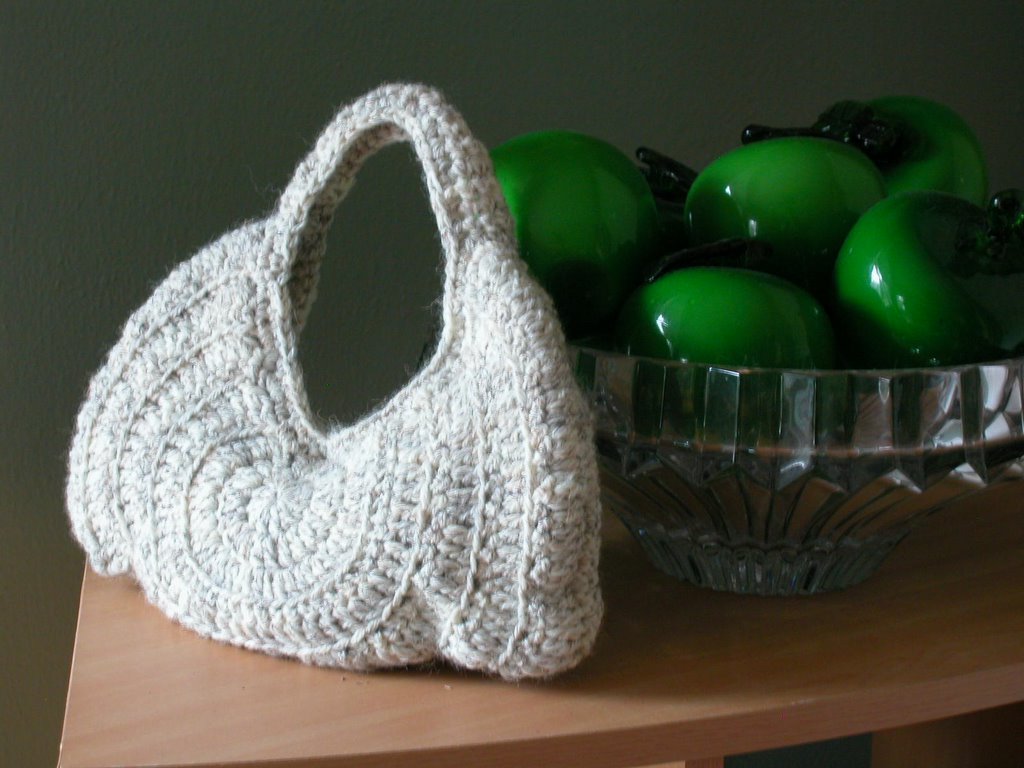
 As seen on HGTV, this beach bag is an easy intro to crochet cables! Made with mercerized cotton it is just the right size to take to the beach or around town!
Click here for PDF download version.
MATERIALS
Crochet hook size F/5[3.75mm]
Patons Grace 100% Mercerized Cotton
1.75oz (136yds) Spearmint
1.74oz (136yds) Ginger
(2) Large-eyed .5” glass beads in coordinating color
DESCRIPTION
This little drawstring bag is simply a rectangle that is cinched tight at one end, and cinched loosely at the other end with a drawstring. A simple long handle makes it great for the beach.
INSTRUCTIONS
BAG
With Spearmint Ch 51:
Row 1: (RS) Sc in 2nd ch from hook and in each ch across (50 sc)
Rows 2-3: Ch 1, turn, sc in each st across.
Row 4: Ch 2, turn, *skip one st, dc in next three sts, dc in skipped st working behind the previous sts*. Repeat from * to * across. Dc in last st.
Row 5: Ch 1, turn, working in back loops only, sc in each st across.
Row 6: Ch 1, turn, working in front loops only, sc in each st across.
Row 7: Ch 2, turn, *skip one st, dc in next three sts, dc in skipped st working in front of the previous sts*. Repeat from * to * across. Dc in last st.
Rows 8-10: Ch 1, turn, sc in each st across.
Fasten off.
With Ginger:
Row 1: With RS facing, attach yarn with a sc to first st of row. Sc in each st across.
Rows 2-3: Ch 1, turn, sc in each st across.
Row 4: Ch 2, turn, *skip one st, dc in next three sts, dc in skipped st working behind the previous sts*. Repeat from * to * across. Dc in last st.
Row 5: Ch 1, turn, working in back loops only, sc in each st across.
Row 6: Ch 1, turn, working in front loops only, sc in each st across.
Row 7: Ch 2, turn, *skip one st, dc in next three sts, dc in skipped st working in front of the previous sts*. Repeat from * to * across. Dc in last st.
Rows 8-10: Ch 1, turn, sc in each st across.
Fasten off.
Repeat pattern alternating between Spearmint and Ginger until you have a total of six stripes. Weave in all ends before continuing.
DRAWSTRING
With Spearmint ch 2, sc in 2nd ch from hook. *Ch 2, sc in back loop of previous st*. Repeat from * to * until drawstring is 20” long.
HANDLE
With Ginger ch 2, sc in 2nd ch from hook. *Ch 2, sc in back loop of previous st*. Repeat from * to * until handle is 30” long.
ASSEMBLY
Fold rectangle in half, matching up the first and last rows with RS facing, and whip stitch together to create tube. Turn RS out. Thread a long piece of yarn through the ends of one side of the tube and cinch completely closed and secure tightly. This is your basic bag.
Thread drawstring around top of bag about one inch down from the edge through the holes created by the pattern. Thread one bead on each end of drawstring and secure each with a simple knot.
Attach handle by whip stitching one inch of each end inside opposite sides of top of bag.
As seen on HGTV, this beach bag is an easy intro to crochet cables! Made with mercerized cotton it is just the right size to take to the beach or around town!
Click here for PDF download version.
MATERIALS
Crochet hook size F/5[3.75mm]
Patons Grace 100% Mercerized Cotton
1.75oz (136yds) Spearmint
1.74oz (136yds) Ginger
(2) Large-eyed .5” glass beads in coordinating color
DESCRIPTION
This little drawstring bag is simply a rectangle that is cinched tight at one end, and cinched loosely at the other end with a drawstring. A simple long handle makes it great for the beach.
INSTRUCTIONS
BAG
With Spearmint Ch 51:
Row 1: (RS) Sc in 2nd ch from hook and in each ch across (50 sc)
Rows 2-3: Ch 1, turn, sc in each st across.
Row 4: Ch 2, turn, *skip one st, dc in next three sts, dc in skipped st working behind the previous sts*. Repeat from * to * across. Dc in last st.
Row 5: Ch 1, turn, working in back loops only, sc in each st across.
Row 6: Ch 1, turn, working in front loops only, sc in each st across.
Row 7: Ch 2, turn, *skip one st, dc in next three sts, dc in skipped st working in front of the previous sts*. Repeat from * to * across. Dc in last st.
Rows 8-10: Ch 1, turn, sc in each st across.
Fasten off.
With Ginger:
Row 1: With RS facing, attach yarn with a sc to first st of row. Sc in each st across.
Rows 2-3: Ch 1, turn, sc in each st across.
Row 4: Ch 2, turn, *skip one st, dc in next three sts, dc in skipped st working behind the previous sts*. Repeat from * to * across. Dc in last st.
Row 5: Ch 1, turn, working in back loops only, sc in each st across.
Row 6: Ch 1, turn, working in front loops only, sc in each st across.
Row 7: Ch 2, turn, *skip one st, dc in next three sts, dc in skipped st working in front of the previous sts*. Repeat from * to * across. Dc in last st.
Rows 8-10: Ch 1, turn, sc in each st across.
Fasten off.
Repeat pattern alternating between Spearmint and Ginger until you have a total of six stripes. Weave in all ends before continuing.
DRAWSTRING
With Spearmint ch 2, sc in 2nd ch from hook. *Ch 2, sc in back loop of previous st*. Repeat from * to * until drawstring is 20” long.
HANDLE
With Ginger ch 2, sc in 2nd ch from hook. *Ch 2, sc in back loop of previous st*. Repeat from * to * until handle is 30” long.
ASSEMBLY
Fold rectangle in half, matching up the first and last rows with RS facing, and whip stitch together to create tube. Turn RS out. Thread a long piece of yarn through the ends of one side of the tube and cinch completely closed and secure tightly. This is your basic bag.
Thread drawstring around top of bag about one inch down from the edge through the holes created by the pattern. Thread one bead on each end of drawstring and secure each with a simple knot.
Attach handle by whip stitching one inch of each end inside opposite sides of top of bag.


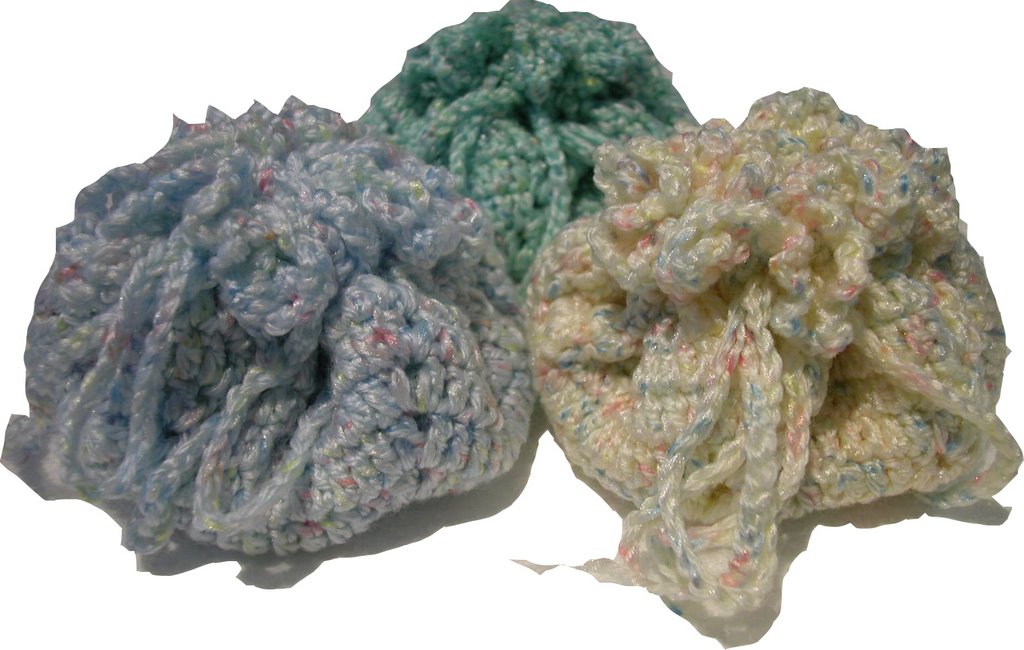
Purl McBigBottom
a drawstring purse to knit!
aka The Crochet Dude™
Click here for PDF download version
Materials
110yds (7 oz) of your favorite bulky weight yarn
Circular knitting needles
Size #17 (12mm) 16” (40.5cm)
Double Pointed Needles
Size #17 (12mm)
Tapestry needle
Gauge
Not essential. Use your favorite yarn with appropriate needles and you’ll get a different sized purse.
Note
Entire purse is worked in the round from the top down.
Instructions
Rnd 4 *YO, k2tog*. Repeat from * to * around.
Rnds 5-7 Knit
Rnds 8-11 *Purl 1, knit 1 through back loop*. Repeat from * to * around.
Rnds 12-15 Knit
Repeat Rnds 8-15 once more. Bind off.
Using double-pointed needles, cast on 4 sts.
Knit but don't turn at the end of row.
Slide all the sts back to the beginning of the needle where they are mounted, and knit the row again. Repeat until the cord is 28”. Gently tug at the ends of the i-cord and and gaps will close up. Bind off.
Assembly


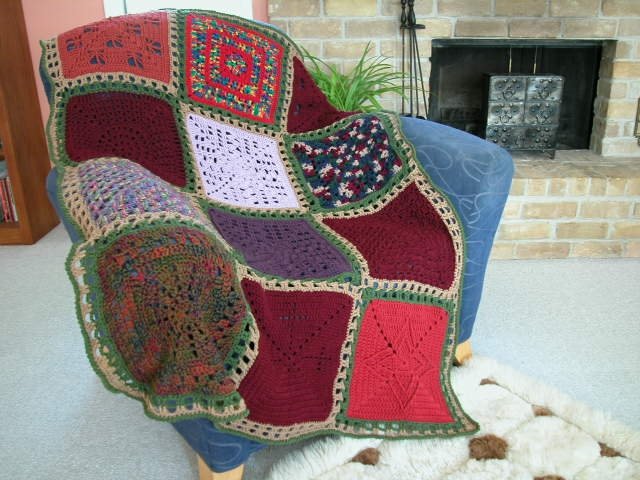


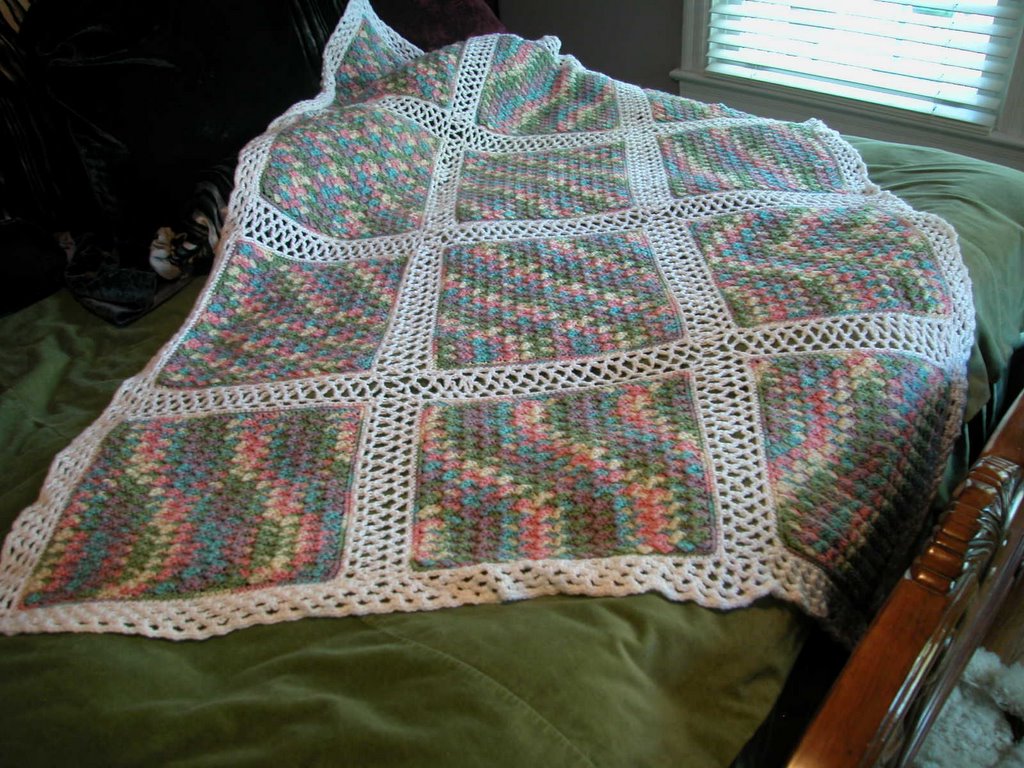
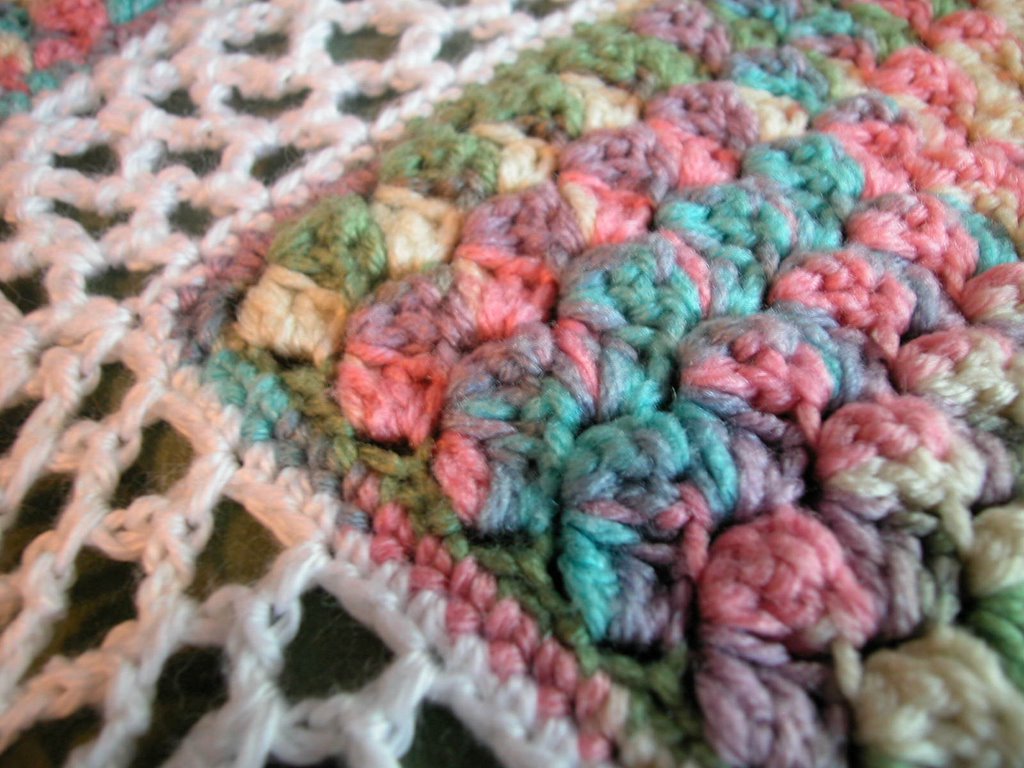 I called this afghan “Monet” because the colors look like an impressionist painting. I suggest making this afghan in any color, either solid or variegated, because the texture of the stitches make it special. The finished afghan measures approximately 46”X66”.
Click Here For Free PDF Download Now Available!
Monet Afghan
©2005 Drew Emborsky, aka The Crochet Dude
Each square measures 13” x 13”
Make 12:
Materials: Worsted Weight yarn – (shown in Red Heart "Water Lily")
I used one 6 oz skein for each square (it's important not to start a new skein in the middle of the square because of the patterning of the colors)
And two 8 oz skeins of white for the joining and the border
Size H crochet hook
Row 1: Ch 47, sc in second ch from hook and in each ch across. (46 sc)
Row 2: Ch 1, (sc, 2 dc) in first st, *skip 2 sc, (sc, 2 dc) in next st * across. Sc in last st.
Row 3-33: Ch 1, (sc, 2 dc) in each single crochet across ending with a sc in the last st.
Row 34, sc in each st across. Do not fasten off. Sc evenly around square working 3 sc in each corner. Fasten off.
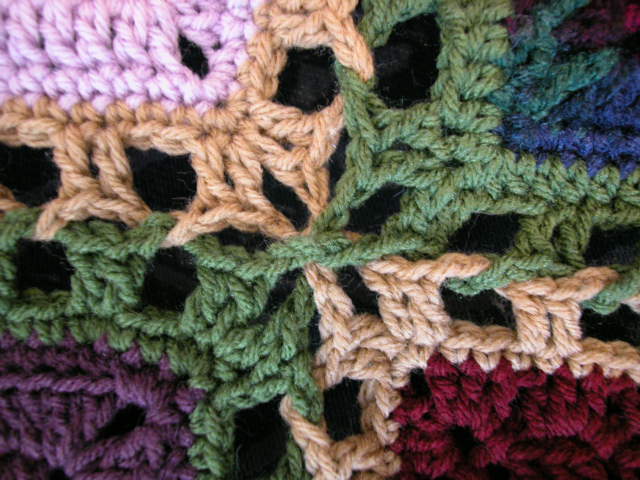
Join squares together using a simplified Lattice Technique (origin unknown) as follows:
Rnd 1: With contrasting color join with a sc in any corner, work 2 more sc in same st, work 47 sc on each side and work 3 sc in each corner. Join with a slip st.
Rnd 2: Slip st into corner st. Ch1, (sc, ch 4, sc) in same st. (Ch 3, skip 2 sc, sc in next st) around, working (sc, ch 4, sc) in each corner st. Slip st to first sc, fasten off.
Lay the squares out in a 3 by 4 pattern. First join squares together to make three long strips with four squares each. Then join the three strips together to create ghan. Join by making a sc in corner loop, ch 3, sc in corresponding loop on opposite square. Ch 3, sc in next loop of first square, ch 3, sc in corresponding loop of opposite square, and so on back and forth.
Once joined, edge entire afghan by working three rounds of (sc, ch 3) in each loop.
I called this afghan “Monet” because the colors look like an impressionist painting. I suggest making this afghan in any color, either solid or variegated, because the texture of the stitches make it special. The finished afghan measures approximately 46”X66”.
Click Here For Free PDF Download Now Available!
Monet Afghan
©2005 Drew Emborsky, aka The Crochet Dude
Each square measures 13” x 13”
Make 12:
Materials: Worsted Weight yarn – (shown in Red Heart "Water Lily")
I used one 6 oz skein for each square (it's important not to start a new skein in the middle of the square because of the patterning of the colors)
And two 8 oz skeins of white for the joining and the border
Size H crochet hook
Row 1: Ch 47, sc in second ch from hook and in each ch across. (46 sc)
Row 2: Ch 1, (sc, 2 dc) in first st, *skip 2 sc, (sc, 2 dc) in next st * across. Sc in last st.
Row 3-33: Ch 1, (sc, 2 dc) in each single crochet across ending with a sc in the last st.
Row 34, sc in each st across. Do not fasten off. Sc evenly around square working 3 sc in each corner. Fasten off.
Join squares together using a simplified Lattice Technique (origin unknown) as follows:
Rnd 1: With contrasting color join with a sc in any corner, work 2 more sc in same st, work 47 sc on each side and work 3 sc in each corner. Join with a slip st.
Rnd 2: Slip st into corner st. Ch1, (sc, ch 4, sc) in same st. (Ch 3, skip 2 sc, sc in next st) around, working (sc, ch 4, sc) in each corner st. Slip st to first sc, fasten off.
Lay the squares out in a 3 by 4 pattern. First join squares together to make three long strips with four squares each. Then join the three strips together to create ghan. Join by making a sc in corner loop, ch 3, sc in corresponding loop on opposite square. Ch 3, sc in next loop of first square, ch 3, sc in corresponding loop of opposite square, and so on back and forth.
Once joined, edge entire afghan by working three rounds of (sc, ch 3) in each loop.


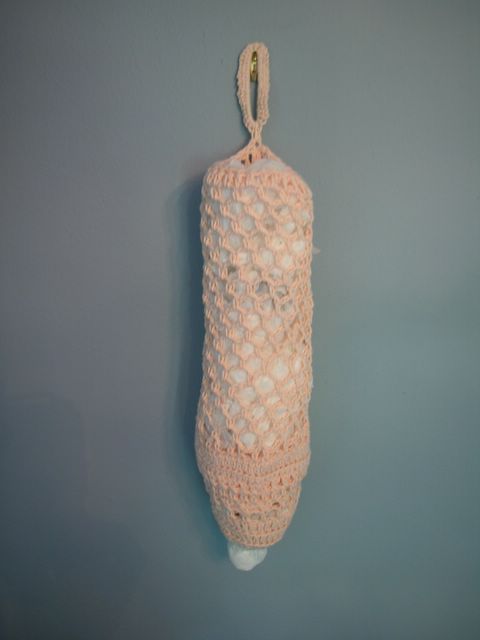 Grocery Bag Dispenser
© 2005 Drew Emborsky, The Crochet Dude
Materials: Worsted Weight Cotton
Crochet Hook, Size H (5.00mm)
Two 5” elastic ponytail bands
Rnd 1: Join to stretchy thingie with a slip st. Ch 3, 29 dc around ring. Slip st to top of beginning ch 3.
Rnd 2 & 3: Ch 3, dc in backloop of each st around. Slip st to top of beginning ch 3.
Rnd 4: Ch 1, sc in same st, ch 3, *skip one st, sc in next st, ch 3 * around. Slip st to beginning ch 1.
Rnd 5: Ch 2, dc in next ch 3 loop, dc in previous ch 3 loop. *dc in next unworked loop, dc in previous loop * around. Slip st to beginning dc.
Rnd 6: Ch 1, sc in same st, ch 2,* sc in next st, ch 2 * around. Slip st to beginning sc.
Rnd 7: Ch 2, dc in next ch 2 loop, dc in previous ch 2 loop. *dc in next unworked loop, dc in previous loop * around. Slip st to beginning dc.
Rnd 8: Ch 1, sc in same st and in each st around. Slip st to beginning sc.
Rnd 9: Ch 3, working in backloops only, dc in each st around. Slip st to top of beginning ch 3.
Rnd 10: Ch 1, sc in same st. Ch 2, * skip one st, sc in next st, ch 2 * around. Slip st to beginning sc.
Rnds11: Slip st into loop. Ch 1, sc in same loop. Ch 3, * skip one loop, sc in next loop, ch 3 * around. Create final loop of rnd with ch 1, sc in beginning sc.
Rnds 12-27: Ch 1, sc in same loop. Ch 3, * sc in next loop, ch 3 * around. Create final loop of rnd with ch 1, sc in beginning sc.
Rnd 28: Ch 3, dc in each loop and each st around. Slip st to top of beginning ch 3.
Rnd 29: Slip st in each st around. Do not Fasten off.
Ring for Hanging. Work 44 sc around the second elastic band. Slip st to next st on Rnd 29. Fasten off.
Grocery Bag Dispenser
© 2005 Drew Emborsky, The Crochet Dude
Materials: Worsted Weight Cotton
Crochet Hook, Size H (5.00mm)
Two 5” elastic ponytail bands
Rnd 1: Join to stretchy thingie with a slip st. Ch 3, 29 dc around ring. Slip st to top of beginning ch 3.
Rnd 2 & 3: Ch 3, dc in backloop of each st around. Slip st to top of beginning ch 3.
Rnd 4: Ch 1, sc in same st, ch 3, *skip one st, sc in next st, ch 3 * around. Slip st to beginning ch 1.
Rnd 5: Ch 2, dc in next ch 3 loop, dc in previous ch 3 loop. *dc in next unworked loop, dc in previous loop * around. Slip st to beginning dc.
Rnd 6: Ch 1, sc in same st, ch 2,* sc in next st, ch 2 * around. Slip st to beginning sc.
Rnd 7: Ch 2, dc in next ch 2 loop, dc in previous ch 2 loop. *dc in next unworked loop, dc in previous loop * around. Slip st to beginning dc.
Rnd 8: Ch 1, sc in same st and in each st around. Slip st to beginning sc.
Rnd 9: Ch 3, working in backloops only, dc in each st around. Slip st to top of beginning ch 3.
Rnd 10: Ch 1, sc in same st. Ch 2, * skip one st, sc in next st, ch 2 * around. Slip st to beginning sc.
Rnds11: Slip st into loop. Ch 1, sc in same loop. Ch 3, * skip one loop, sc in next loop, ch 3 * around. Create final loop of rnd with ch 1, sc in beginning sc.
Rnds 12-27: Ch 1, sc in same loop. Ch 3, * sc in next loop, ch 3 * around. Create final loop of rnd with ch 1, sc in beginning sc.
Rnd 28: Ch 3, dc in each loop and each st around. Slip st to top of beginning ch 3.
Rnd 29: Slip st in each st around. Do not Fasten off.
Ring for Hanging. Work 44 sc around the second elastic band. Slip st to next st on Rnd 29. Fasten off.


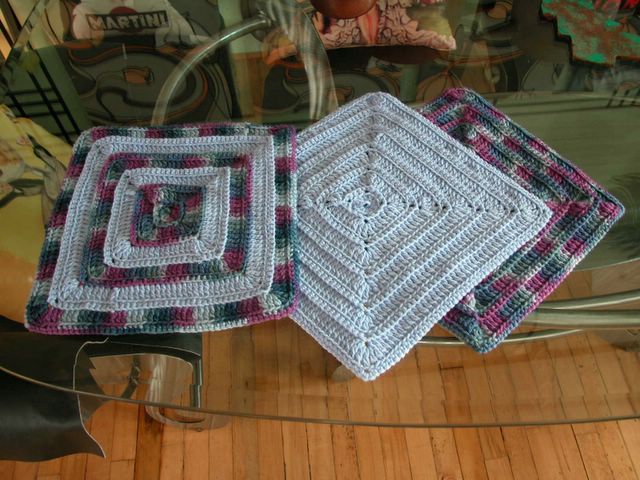
 Groovy Loops
© 2004 Drew Emborsky, The Crochet Dude
Finished size: 12 inch square
Materials: Worsted Weight Yarn
Crochet Hook, Size H
Note: When crocheting rounds 3, 6, 9, and 12, keep all un-worked ch-10 groovy loops on top.
Rnd 1: Ch 4; 11 dc in 4th ch from hook; join with a slip st to top of beginning ch 3.
Rnd 2: Ch 1, sc in same st; ch 4, sc in same st; * ch 10, sc in next st; ch 4, sc in next st; ch 10, sc in next st; ch 4, sc in same st;* 3 times. Ch 10, sc in next st; ch 4, sc in next st; ch 10, slip st in top of beginning sc. (8 ch-10 groovy loops; 8 ch-4 groovy loops)
Rnd 3: Slip st into corner ch 4 loop. Ch 1, 3 sc in corner loop, *ch 2, sc in next ch 4 loop. Ch 2, 3 sc in next ch 4 loop * 3 times. Ch 2, sc in next ch 4 loop. Ch 2, Slip st to first sc.
Rnd 4: Slip st in next st. Ch 3, (dc, ch2, 2 dc) in same st, dc in next st. * 2 dc in each ch 2 space across; dc in next st; (2 dc, ch2, 2 dc) in corner st, dc in next st. * 3 times. 2 dc in each ch 2 space across; dc in next st; dc in beginning corner; slip st to top of beginning ch 3. (40 dc)
Rnd 5: Slip st into corner space, ch 1, sc in same space, ch 4, sc in same space; † *ch 10 sc in next st; ch 4 sc in next st* 5 times; ch 10, sc in corner st; ch 4 sc in same st. † Repeat from † to † 3 times. Ch 10 sc in next st; ch 4 sc in next st* 4 times; ch 10, slip st to beginning sc. (24 ch-10 groovy loops; 24 ch-4 groovy loops)
Rnd 6: Slip st into corner ch 4 loop. Ch 1, 3 sc in corner loop, † * ch 2, sc in next ch 4 loop.* 4 times. Ch 2, 3 sc in next ch 4 loop. † Repeat from † to † 3 times. * Ch 2, sc in next ch 4 loop * 4 times. Ch 2, slip st to top of first sc.
Rnd 7: Ch 3, (dc, ch2, 2 dc) in same st, dc in next st.. * 2 dc in each ch 2 space across; dc in next st; (2 dc, ch2, 2 dc) in corner st, dc in next st. * 3 times. 2 dc in each ch 2 space across; dc in next st; slip st to top of beginning ch 3. (72 dc)
Rnd 8: Slip st into corner space, ch 1, sc in same space, ch 4, sc in same space; † *ch 10 sc in next st; ch 4 sc in next st* 7 times; ch 10, sc in corner st; ch 4 sc in same st. † Repeat from † to † 3 times. Ch 10 sc in next st; ch 4 sc in next st* 7 times; ch 10, slip st to beginning sc. (40 ch-10 groovy loops; 40 ch-4 groovy loops)
Rnd 9: Slip st into corner ch 4 loop. Ch 1, 3 sc in corner loop, † * ch 2, sc in next ch 4 loop.* 9 times. Ch 2, 3 sc in next ch 4 loop. † Repeat from † to † 3 times. * Ch 2, sc in next ch 4 loop * 9 times. Ch 2, slip st to top of first sc.
Rnd 10: Ch 3, (dc, ch2, 2 dc) in same st, dc in next st.. * 2 dc in each ch 2 space across; dc in next st; (2 dc, ch2, 2 dc) in corner st, dc in next st. * 3 times. 2 dc in each ch 2 space across; dc in next st; slip st to top of beginning ch 3. (106 dc).
Rnd 11: Slip st into corner space, ch 1, sc in same space ch 4, sc in same space; † *ch 10 sc in next st; ch 4 sc in next st* 13 times; ch 10, sc in corner st; ch 4 sc in same st. † Repeat from † to † 3 times. Ch 10 sc in next st; ch 4 sc in next st* 13 times; ch 10, slip st to beginning sc. (56 ch-10 groovy loops; 56 ch-4 groovy loops)
Rnd 12: Slip st into corner ch 4 loop. Ch 1, 3 sc in corner loop, † * ch 2, sc in next ch 4 loop.* 9 times. Ch 2, 3 sc in next ch 4 loop. † Repeat from † to † 3 times. * Ch 2, sc in next ch 4 loop * 9 times. Ch 2, slip st to top of first sc. Fasten off.
Groovy Loops
Groovy Loops
© 2004 Drew Emborsky, The Crochet Dude
Finished size: 12 inch square
Materials: Worsted Weight Yarn
Crochet Hook, Size H
Note: When crocheting rounds 3, 6, 9, and 12, keep all un-worked ch-10 groovy loops on top.
Rnd 1: Ch 4; 11 dc in 4th ch from hook; join with a slip st to top of beginning ch 3.
Rnd 2: Ch 1, sc in same st; ch 4, sc in same st; * ch 10, sc in next st; ch 4, sc in next st; ch 10, sc in next st; ch 4, sc in same st;* 3 times. Ch 10, sc in next st; ch 4, sc in next st; ch 10, slip st in top of beginning sc. (8 ch-10 groovy loops; 8 ch-4 groovy loops)
Rnd 3: Slip st into corner ch 4 loop. Ch 1, 3 sc in corner loop, *ch 2, sc in next ch 4 loop. Ch 2, 3 sc in next ch 4 loop * 3 times. Ch 2, sc in next ch 4 loop. Ch 2, Slip st to first sc.
Rnd 4: Slip st in next st. Ch 3, (dc, ch2, 2 dc) in same st, dc in next st. * 2 dc in each ch 2 space across; dc in next st; (2 dc, ch2, 2 dc) in corner st, dc in next st. * 3 times. 2 dc in each ch 2 space across; dc in next st; dc in beginning corner; slip st to top of beginning ch 3. (40 dc)
Rnd 5: Slip st into corner space, ch 1, sc in same space, ch 4, sc in same space; † *ch 10 sc in next st; ch 4 sc in next st* 5 times; ch 10, sc in corner st; ch 4 sc in same st. † Repeat from † to † 3 times. Ch 10 sc in next st; ch 4 sc in next st* 4 times; ch 10, slip st to beginning sc. (24 ch-10 groovy loops; 24 ch-4 groovy loops)
Rnd 6: Slip st into corner ch 4 loop. Ch 1, 3 sc in corner loop, † * ch 2, sc in next ch 4 loop.* 4 times. Ch 2, 3 sc in next ch 4 loop. † Repeat from † to † 3 times. * Ch 2, sc in next ch 4 loop * 4 times. Ch 2, slip st to top of first sc.
Rnd 7: Ch 3, (dc, ch2, 2 dc) in same st, dc in next st.. * 2 dc in each ch 2 space across; dc in next st; (2 dc, ch2, 2 dc) in corner st, dc in next st. * 3 times. 2 dc in each ch 2 space across; dc in next st; slip st to top of beginning ch 3. (72 dc)
Rnd 8: Slip st into corner space, ch 1, sc in same space, ch 4, sc in same space; † *ch 10 sc in next st; ch 4 sc in next st* 7 times; ch 10, sc in corner st; ch 4 sc in same st. † Repeat from † to † 3 times. Ch 10 sc in next st; ch 4 sc in next st* 7 times; ch 10, slip st to beginning sc. (40 ch-10 groovy loops; 40 ch-4 groovy loops)
Rnd 9: Slip st into corner ch 4 loop. Ch 1, 3 sc in corner loop, † * ch 2, sc in next ch 4 loop.* 9 times. Ch 2, 3 sc in next ch 4 loop. † Repeat from † to † 3 times. * Ch 2, sc in next ch 4 loop * 9 times. Ch 2, slip st to top of first sc.
Rnd 10: Ch 3, (dc, ch2, 2 dc) in same st, dc in next st.. * 2 dc in each ch 2 space across; dc in next st; (2 dc, ch2, 2 dc) in corner st, dc in next st. * 3 times. 2 dc in each ch 2 space across; dc in next st; slip st to top of beginning ch 3. (106 dc).
Rnd 11: Slip st into corner space, ch 1, sc in same space ch 4, sc in same space; † *ch 10 sc in next st; ch 4 sc in next st* 13 times; ch 10, sc in corner st; ch 4 sc in same st. † Repeat from † to † 3 times. Ch 10 sc in next st; ch 4 sc in next st* 13 times; ch 10, slip st to beginning sc. (56 ch-10 groovy loops; 56 ch-4 groovy loops)
Rnd 12: Slip st into corner ch 4 loop. Ch 1, 3 sc in corner loop, † * ch 2, sc in next ch 4 loop.* 9 times. Ch 2, 3 sc in next ch 4 loop. † Repeat from † to † 3 times. * Ch 2, sc in next ch 4 loop * 9 times. Ch 2, slip st to top of first sc. Fasten off.


 The Crochet Dude
 National Member